Aspire CE5-S Clearomizer Instructions
About the Aspire Ce5-S Clearomizer
The next step up from the older style, disposable CE4's, these clearomizers use a replaceable coil design that offers convenience, better performance and less waste, whilst still being easy to use.
Please see below for instructions on using and maintaining the CE5-S Clearomizer.
Instructions
How to Fill the Tank
To fill the tank, unscrew the base and put it to one side, then, holding the tank with the mouthpiece facing down, simply squeeze your e-liquid in, making sure NOT to pour it into the metal central tube. Also ensure you do not let the e-liquid level go above the top of the central tube. You can then screw the base firmly back onto the bottom of the tank and attach it to your battery.
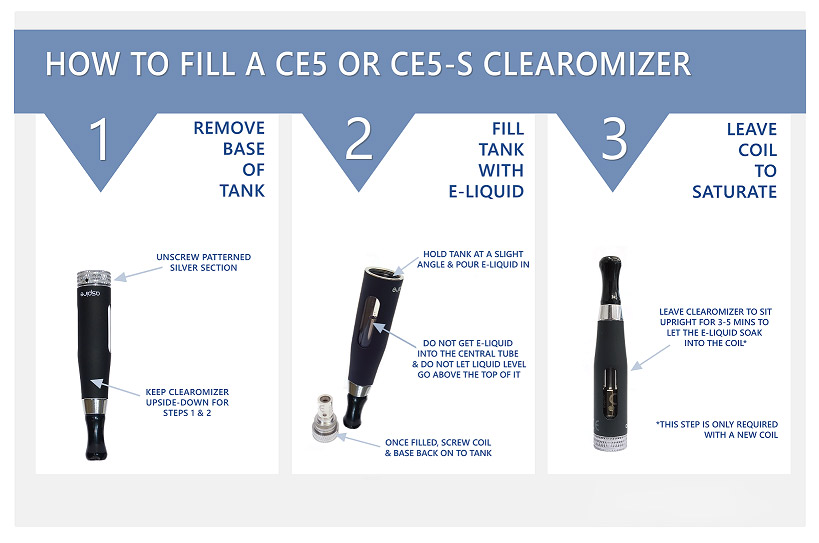
These coils need time to 'prime' so when you are using a new coil, always leave it for a few minutes before vaping to allow the cotton to soak up the e-liquid. If you don't do this, you will get a nasty burnt taste and will need to dispose of that coil. Do not allow the e-liquid in your tank to get too low as this could also burn out your coil. The CE5-S clearomizer comes with one free coil.
How Long Will A Coil Last?
On average, the Aspire BVC coils (or CE5-S Coils) will last a moderate vaper around 10 days but they may last longer for a light user or less time for a heavy vaper. You should change your coil once the taste begins to deteriorate.
Please note that these usage times are based on using our own range of e-liquids. Other brands may have higher VG (vegetable glycerine) content which can reduce the life expectancy of a coil. Click here for more information about PG/VG and e liquid ingredients.
How do I Change the Coil?
To change the coil, unscrew the base from the bottom of the tank (make sure you hold it upside-down if there's still liquid in the tank). The coil is the steel part that protrudes from the base. Grip the coil and unscrew it from the base - you may want to use some tissue as it might be a little messy, then simply screw your new coil in place and screw the base back onto the tank. Remember to then leave it for a few minutes sat upright with e-liquid in the tank in order to prime the coil.
You can find out more about how to prime a coil here.
How To Clean the CE-5 Clearomizer
We recommend cleaning your clearomizer frequently to remove any build up of e liquid. To do this, remove the base of your tank (preferably when it's almost empty so as not to waste any e liquid!). Make sure you then unscrew the coil from the base as you don't want to get this wet. Remove the mouthpiece from your tank by simply pulling it out. You can then give everything a good rinse with warm water.
Be careful not to lose the seals around the mouthpiece else it won't fit snugly back on the tank. There are also important seals on the base of the tank - don't lose these either as this may cause the tank to leak.
It's a particularly good idea to clean the mouthpiece regularly, seeing as you're putting it in your mouth!
And that's it! Hopefully you're now confident with using and maintaining your CE5-S Clearomizer. However, if you have any questions or are unclear on any of the above instructions, please do not hesitate to contact one of our friendly customer service team members.


